

Data packs are a fantastic way to enhance your Minecraft experience, allowing you to add new features, mechanics, and custom content to your game. This guide will walk you through the process of installing data packs in Minecraft, both for single-player worlds and multiplayer servers.
Understanding Data Packs
Data packs are a collection of files that modify or add new content to Minecraft using vanilla commands. They can change game mechanics, add new recipes, introduce custom structures, and more. Data packs are versatile and compatible with both single-player and multiplayer environments.
How to Install a Data Pack in Minecraft
How to Install a Data Pack
- Download the Data Pack: First, find a data pack you want to use. Ensure it’s compatible with your version of Minecraft.
- Locate Your World Folder: Navigate to the
.minecraft/savesdirectory on your computer. This is where all your single-player world files are stored. - Open the World Folder: Open the folder of the world where you want to install the data pack.
- Find or Create the Datapacks Folder: Inside your world folder, find the
datapacksfolder. If it doesn’t exist, create a new folder and name itdatapacks. - Add the Data Pack: Place the data pack file (usually a .zip or a folder) into the
datapacksfolder. - Activate the Data Pack: Start Minecraft and load your world. Use the
/reloadcommand to activate the data pack without restarting the game. You can also check if the data pack is active by using the/datapack listcommand.
How to Install a Datapack in Minecraft
- Ensure Compatibility: Make sure the data pack is compatible with your Minecraft version.
- Download the Datapack: Obtain the data pack from a trusted source.
- Add to Datapacks Folder: Follow the steps above to add the data pack to the
datapacksfolder in your desired world.
How to Install Data Packs in Minecraft Server
How to Install Data Packs in Minecraft Server
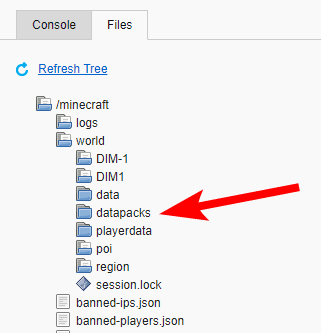
- Access Server Files: Use an FTP client or your server’s control panel to access the server files.
- Navigate to the World Folder: Find the folder for the world you want to add the data pack to. This is typically named
worldby default, but it could be different if you have multiple worlds. - Locate or Create Datapacks Folder: Inside the world folder, locate the
datapacksfolder. If it doesn’t exist, create one. - Upload the Data Pack: Upload the data pack file (zip or folder) into the
datapacksfolder. - Activate the Data Pack: Restart your server to load the new data pack. You can also use the
/reloadcommand if your server supports it to activate the data pack without restarting.
How to Install Datapacks
How to Install Datapacks
- Download and Verify: Ensure the datapack is compatible with your version of Minecraft and download it.
- Place in Datapacks Folder: Place the downloaded data pack in the
datapacksfolder of your world or server. - Load and Activate: Use the
/reloadcommand in-game to load and activate the data pack, or restart the server for server installations.
Tips for Managing Data Packs
- Keep Backups: Always keep backups of your worlds before adding new data packs to avoid potential data loss.
- Check Compatibility: Ensure that data packs are compatible with each other to prevent conflicts.
- Update Regularly: Keep your data packs updated to the latest version to ensure compatibility with the latest Minecraft updates.
Conclusion
Installing data packs in Minecraft is a straightforward process that can greatly enhance your gaming experience by adding custom content and new mechanics. Whether you’re playing in single-player mode or managing a multiplayer server, following these steps will help you seamlessly integrate data packs into your game.