
7 Days to Die is a popular survival horror game that challenges players to survive in a post-apocalyptic world filled with zombies. Whether you’re playing solo or with friends, having control over your own 7 Days to Die server can elevate the gaming experience. In this guide, we’ll explore everything from 7 Days to Die server hosting, game world options, and game stages to how you can set up a dedicated server for free.

7 Days to Die Server Hosting Options
Hosting a server allows you to fully customize your gaming experience, play with friends, and adjust settings like difficulty, loot spawn rates, and more. When it comes to 7 Days to Die hosting, you have several options to consider:
1. Renting a 7 Days to Die Server
Renting a server from a professional hosting provider is one of the most reliable ways to host a game. When you rent a server, the hosting company takes care of the server hardware, uptime, and performance, allowing you to focus on gameplay. Popular hosting services like Nitrado, Host Havoc, and GTX Gaming offer easy setups and robust server control panels.
Benefits of Renting a 7 Days to Die Server:
- 24/7 uptime and reliability
- Full customization of game settings
- No need to worry about hardware or internet connection issues
- Access to technical support
2. Free 7 Days to Die Server Hosting
Some players look for 7 Days to Die free server hosting to get started without paying a monthly fee. While completely free options are limited, there are alternatives like hosting a dedicated server on your own PC.
How to Set Up a Free Dedicated Server:
- Download the Server Files: Open Steam, go to the Tools section, and download the 7 Days to Die Dedicated Server.
- Set Up the Server: After downloading, extract the files and configure the server settings in the
serverconfig.xmlfile. - Start the Server: Run the
startdedicated.batfile to launch your server. You can invite friends to join using your public IP or through your local network.
Pros and Cons of Free Hosting:
- Pros: No cost, complete control over settings, can be set up on your own hardware.
- Cons: Requires strong hardware and internet, limited support, and potential downtime if your PC shuts down.
7 Days to Die Game Stages and Progression
The game stages in 7 Days to Die refer to the progression system that dictates the difficulty and types of enemies you face. As you survive longer and level up, the game introduces more dangerous zombies, tougher enemies, and larger hordes.
How Game Stages Work:
- Starting Game Stage: When you first start, the zombies are relatively weak, and you have time to gather resources.
- Mid-Game Stage: As you reach higher levels, more special zombies like Feral Zombies and Spider Zombies appear.
- Late-Game Stage: By the late game, you face larger hordes, zombies with increased speed and health, and new threats like Zombie Bears and Radiated Zombies.
Game stages can be modified through server settings, allowing you to create easier or more challenging gameplay.
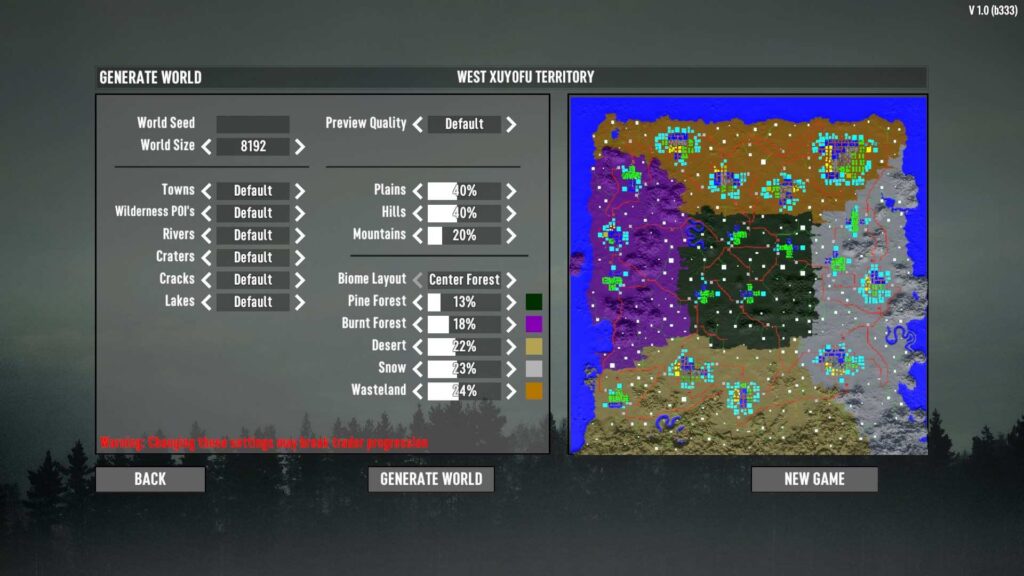
7 Days to Die Game World Options
When hosting a server or playing single-player, game world options allow you to customize how the world is generated and how difficult the game is. Here’s a breakdown of the most important settings:
1. World Generation
You can choose between two types of world generation:
- Navezgane: A pre-generated map with predefined locations and points of interest.
- Random Gen: A randomly generated map based on seed inputs. This offers endless replayability, as no two maps are the same.
2. Difficulty Settings
You can adjust the overall difficulty of the game using the following settings:
- Scavenger: Easiest difficulty with fewer zombies and weaker enemies.
- Survivalist: Medium difficulty with a balance of challenge and resource availability.
- Insane: The hardest difficulty with tough zombies, less loot, and a survival-first approach.
3. Day/Night Cycle
The day/night cycle can also be customized. For example, you can set how long the daytime and nighttime periods last. Nights are generally more dangerous as zombies become faster and more aggressive after dark.
4. Loot Settings
- Loot Respawn Time: Determines how often loot in containers regenerates.
- Loot Abundance: Controls the quantity of items found in containers.
How to Host a 7 Days to Die Server
Whether you’re hosting a server for free on your own hardware or renting one, the process is similar.
1. Choosing a Hosting Provider
If you’re opting for a professional hosting service, compare prices, server locations, and customer support options. Most services offer easy-to-use control panels for setting up your 7 Days to Die host server.
2. Setting Up Your Server Configuration
After choosing a host, you’ll need to configure the settings. You can customize the game world, difficulty, and loot settings in the serverconfig.xml file or through the hosting provider’s control panel.
3. Launching the Server
Once the server is set up, simply launch it from the control panel or use the startdedicated.bat file if you’re hosting locally. Players can join the server using your IP address or through the Steam friends list.
ULX Admin Mod for 7 Days to Die
If you’re looking to manage your server effectively, consider using admin mods to help manage players, enforce rules, and customize gameplay. ULX Admin Mod, while mainly used for Garry’s Mod, has equivalents in 7 Days to Die, which provide tools for kicking, banning, and managing in-game player behavior.
Conclusion
Hosting your own 7 Days to Die server allows you to fully customize your gaming experience, invite friends, and control all aspects of the game world. Whether you choose to rent a server or go for free hosting using your own hardware, setting up a server can elevate the fun of surviving in the post-apocalyptic world. With the ability to control game world options and game stages, you can tailor the gameplay to your preferred style, making each playthrough unique.